
| 일 | 월 | 화 | 수 | 목 | 금 | 토 |
|---|---|---|---|---|---|---|
| 1 | 2 | 3 | 4 | 5 | 6 | 7 |
| 8 | 9 | 10 | 11 | 12 | 13 | 14 |
| 15 | 16 | 17 | 18 | 19 | 20 | 21 |
| 22 | 23 | 24 | 25 | 26 | 27 | 28 |
| 29 | 30 |
- Android
- python3
- kotlin
- Java
- gson
- 셀레니움
- ViewPager2
- 안드로이드 API
- TODO
- RETROFIT
- REST API
- 웹 크롤링
- 데이터바인딩
- FragmentStateAdapter
- ViewModel
- github api
- 안드로이드 플랫폼
- Devexpress
- Android 컴파일
- LRU
- RecyclerView
- 통계대학원
- 필답고사
- TabLayout
- Clean Architecture
- okHttp
- AndroidX
- 수리통계
- Kotiln
- 백준 15686
- Today
- Total
그냥 가끔의 기록장
[Kotlin] Todo 토이 프로젝트 [1단계] (ViewPager2 + RecyclerView + ViewModel) 본문
[Kotlin] Todo 토이 프로젝트 [1단계] (ViewPager2 + RecyclerView + ViewModel)
the phoenix 2022. 4. 23. 16:52아주 오랜만에 블로그에 글을 쓰는데, 최근에 진행한 Todo 토이 프로젝트를 순서대로 작성해볼까 한다. Github에 순서대로 commit도 했으니 참고하면 좋을 것 같다. 최종 결과물은 아래 움짤과 같다. (용량이 커서 중간에 짤렸지만 ㅠㅠ ADD, DELTE도 된다)
기능은 크게 Add, Delete, CheckBox Update 3가지다.
1. item들의 checkBox를 클릭해 done으로 체크되면 Done Tab으로 넘어가고, checkBox를 다시 클릭해 done이 해제가 되면 Pending Tab으로 item이 자동으로 이동된다.
2. Pending Tab에서 ADD TODO 버튼을 누르면 item이 새로 추가된다.
3. 각 item의 DELETE 버튼을 클릭하면 해당 item이 삭제된다.

0. RecyclerView, ViewPager2가 뭔지?
(1) ViewPager2
배너광고나 배민 페이지를 보면 좌우로 쓰윽 스와이프해서 화면을 이동하는 기능을 본 적이 있을 것이다. ViewPager2는 스와이프로 화면을 전환하게 해주는 Component로, 본 토이 프로젝트에서는 기존의 ViewPager가 아니라 구글에서 권장하는 ViewPager2를 사용했다.
일반적으로 구현 순서는 다음과 같다. (본 글에서 주로 다루는 부분)
1. View Pager2에서 포함할 Fragment들이나 사진이나 등등 item들 생성 (여기선 Fragment를 택함, 즉 ViewPager2를 좌우로 스와이프하면 Fragment들이 바뀌는 것)
2. View Pager2를 포함할 Activity / Fragment 생성
3. View Pager2에서 사용할 FragmentStateAdapter 구현
4. FragmentStateAdapter랑 2의 Activity나 Fragment 연동
(5. 추가로 ViewPager2랑 TabLayout도 연동 가능 - 이 경우 Tab을 클릭해서 화면 이동, 스와이프로 화면 이동 둘 다 가능해짐)
(2) RecyclerView
수 많은 item들을 한 화면에 vertical하게, 혹은 horizontal 하게 보여주는 View다.
일반적으로 구현 순서는 다음과 같다. (다음 글에서 주로 다루는 부분)
1. RecyclerView를 포함할 Activity / Fragment 생성
2. RecyclerView 내에 item들을 표현할 xml 생성
3. RecyclerView Adapter 구현 (일반적으로 RecyclerView.Adapter 를 상속하여 onCreateViewHolder, onBindViewHolder, getItemCount를 override 해야 함)
4. 1번에 adapter 연동, RecyclerView의 LayoutManager 지정하기
https://soeun-87.tistory.com/24 참고 가능!
[Kotlin] RecyclerView 예제
안드로이드 기본기가 부족한데 마땅한 강의가 없어서 Google Android Kotlin Course를 듣고 있다. Unit 2 Part3에서 RecyclerView를 사용하는 예제가 나와서 이를 정리해보았다. 0. RecyclerView가 뭔지 과거에는..
soeun-87.tistory.com
1. 단계별 코드
(1) Layout xml 생성 - Fragment, Actvity 용
우리에게 필요한 Fragment, Activity 들의 Layout부터 만들어보자. 우선, 총 4개의 Layout xml 파일을 만들 것이다. Layout 구조를 층층히 쌓아 만든거라 이해하기 쉽도록 그려보았다. (오히려 복잡하게 그린것도 같고...)

1) activity_main.xml
<?xml version="1.0" encoding="utf-8"?>
<androidx.constraintlayout.widget.ConstraintLayout xmlns:android="http://schemas.android.com/apk/res/android"
    xmlns:app="http://schemas.android.com/apk/res-auto"
    xmlns:tools="http://schemas.android.com/tools"
    android:layout_width="match_parent"
    android:layout_height="match_parent"
    tools:context=".MainActivity">

    <com.google.android.material.appbar.MaterialToolbar
        android:id="@+id/toolBar"
        android:layout_width="match_parent"
        android:layout_height="60dp"
        app:layout_constraintEnd_toEndOf="parent"
        app:layout_constraintHorizontal_bias="0.5"
        app:layout_constraintStart_toStartOf="parent"
        app:layout_constraintTop_toTopOf="parent" />

    <FrameLayout
        android:id="@+id/frameLayout"
        android:layout_width="match_parent"
        android:layout_height="0dp"
        app:layout_constraintBottom_toBottomOf="parent"
        app:layout_constraintEnd_toEndOf="parent"
        app:layout_constraintHorizontal_bias="0.5"
        app:layout_constraintStart_toStartOf="parent"
        app:layout_constraintTop_toBottomOf="@+id/toolBar" />

</androidx.constraintlayout.widget.ConstraintLayout>
2) fragment_home.xml
<?xml version="1.0" encoding="utf-8"?>
<FrameLayout
    xmlns:android="http://schemas.android.com/apk/res/android"
    xmlns:app="http://schemas.android.com/apk/res-auto"
    android:layout_width="match_parent"
    android:layout_height="match_parent"
    android:orientation="vertical">

    <androidx.constraintlayout.widget.ConstraintLayout
        android:layout_width="match_parent"
        android:layout_height="match_parent">

        <com.google.android.material.tabs.TabLayout
            android:id="@+id/tabLayout"
            android:layout_width="match_parent"
            android:layout_height="60dp"
            app:layout_constraintEnd_toEndOf="parent"
            app:layout_constraintHorizontal_bias="0.5"
            app:layout_constraintStart_toStartOf="parent"
            app:layout_constraintTop_toTopOf="parent" />

        <androidx.viewpager2.widget.ViewPager2
            android:id="@+id/vpTodo"
            android:layout_width="match_parent"
            android:layout_height="0dp"
            app:layout_constraintBottom_toBottomOf="parent"
            app:layout_constraintEnd_toEndOf="parent"
            app:layout_constraintHorizontal_bias="0.5"
            app:layout_constraintStart_toStartOf="parent"
            app:layout_constraintTop_toBottomOf="@+id/tabLayout" />

    </androidx.constraintlayout.widget.ConstraintLayout>

</FrameLayout>
3) fragment_pending.xml
<?xml version="1.0" encoding="utf-8"?>
<FrameLayout
    xmlns:android="http://schemas.android.com/apk/res/android"
    xmlns:app="http://schemas.android.com/apk/res-auto"
    xmlns:tools="http://schemas.android.com/tools"
    android:layout_width="match_parent"
    android:layout_height="match_parent">

    <androidx.constraintlayout.widget.ConstraintLayout
        android:layout_width="match_parent"
        android:layout_height="match_parent">

        <androidx.recyclerview.widget.RecyclerView
            android:id="@+id/rvPending"
            android:layout_width="match_parent"
            android:layout_height="0dp"
            app:layout_constraintBottom_toTopOf="@+id/btnAddTask"
            app:layout_constraintEnd_toEndOf="parent"
            app:layout_constraintHorizontal_bias="0.5"
            app:layout_constraintStart_toStartOf="parent"
            app:layout_constraintTop_toTopOf="parent" />

        <Button
            android:id="@+id/btnAddTask"
            android:layout_width="wrap_content"
            android:layout_height="wrap_content"
            android:text="ADD TASK"
            android:layout_marginRight="16dp"
            android:layout_marginBottom="16dp"
            app:layout_constraintBottom_toBottomOf="parent"
            app:layout_constraintEnd_toEndOf="parent" />

    </androidx.constraintlayout.widget.ConstraintLayout>

</FrameLayout>
4) fragment_done.xml
<?xml version="1.0" encoding="utf-8"?>
<FrameLayout
    xmlns:android="http://schemas.android.com/apk/res/android"
    android:layout_width="match_parent"
    android:layout_height="match_parent">

    <androidx.recyclerview.widget.RecyclerView
        android:id="@+id/rvDone"
        android:layout_width="match_parent"
        android:layout_height="match_parent"/>

</FrameLayout>
(2) xml 생성 - RecyclerView item 용
이번에는 RecyclerView의 각 item 한줄로 들어갈 xml 파일을 만들어보자.
1) item_todo.xml
<?xml version="1.0" encoding="utf-8"?>
<androidx.constraintlayout.widget.ConstraintLayout xmlns:android="http://schemas.android.com/apk/res/android"
    xmlns:app="http://schemas.android.com/apk/res-auto"
    xmlns:tools="http://schemas.android.com/tools"
    android:layout_width="match_parent"
    android:layout_height="65dp">

    <TextView
        android:id="@+id/tvTitle"
        android:layout_width="0dp"
        android:layout_height="wrap_content"
        android:layout_marginLeft="16dp"
        android:layout_marginRight="16dp"
        android:textSize="24sp"
        android:textStyle="bold"
        app:layout_constraintBottom_toTopOf="@+id/tvContent"
        app:layout_constraintEnd_toStartOf="@+id/cbIsDone"
        app:layout_constraintHorizontal_bias="0.5"
        app:layout_constraintStart_toStartOf="parent"
        app:layout_constraintTop_toTopOf="parent"
        tools:text="title" />

    <TextView
        android:id="@+id/tvContent"
        android:layout_width="0dp"
        android:layout_height="wrap_content"
        android:layout_marginLeft="16dp"
        android:layout_marginRight="16dp"
        android:textSize="18sp"
        app:layout_constraintBottom_toBottomOf="parent"
        app:layout_constraintEnd_toStartOf="@+id/cbIsDone"
        app:layout_constraintHorizontal_bias="0.5"
        app:layout_constraintStart_toStartOf="parent"
        app:layout_constraintTop_toBottomOf="@+id/tvTitle"
        tools:text="content" />

    <CheckBox
        android:id="@+id/cbIsDone"
        android:layout_width="wrap_content"
        android:layout_height="wrap_content"
        app:layout_constraintBottom_toBottomOf="parent"
        app:layout_constraintEnd_toEndOf="parent"
        app:layout_constraintTop_toTopOf="parent" />

</androidx.constraintlayout.widget.ConstraintLayout>
위의 코드 결과로 각 item은 이렇게 생겼다.

(3) xml 생성 - ToolBar menu 용
activity_main에 ToolBar component를 넣어서 ToolBar의 menu로 쓸 xml을 생성하고, Theme도 바꿔주자.
1) res > 우클릭 > New > Android Resource Directory > menu 폴더 생성
2) menu 폴더 내에 app_bar_menu.xml 생성
해당 item 코드를 보면 icon이 있는데, 이건 필자가 직접 넣어준 것이다.
res > New > Image Asset > ic_setting 입력 후 clip Art에서 setting icon 선택 후 finish 하면 생성된다. 안 만들고 코드 가져다 쓰면 오류 나니 꼭 만들기..!
<?xml version="1.0" encoding="utf-8"?>
<menu xmlns:android="http://schemas.android.com/apk/res/android"
    xmlns:app="http://schemas.android.com/apk/res-auto">
    <item
        android:id="@+id/miSetting"
        android:title="Settings"
        android:icon="@drawable/ic_setting_foreground"
        app:showAsAction="never"/>
</menu>
3) themes.xml 수정 (night 아니고 일반 theme임에 주의)
아마 초기에는 Theme.MaterialComponents.DayNight.DarkActionBar 로 되어 있을텐데, 이를 Theme.MaterialComponents.Light.NoActionBar로 바꿔준다. 안그러면 ToolBar가 제대로 실행이 안되고 Build가 안된다.
<resources xmlns:tools="http://schemas.android.com/tools">
    <!-- Base application theme. -->
    <style name="Theme.KotlinToDo" parent="Theme.MaterialComponents.Light.NoActionBar">
        <!-- Primary brand color. -->
        <item name="colorPrimary">@color/purple_500</item>
        <item name="colorPrimaryVariant">@color/purple_700</item>
        <item name="colorOnPrimary">@color/white</item>
        <!-- Secondary brand color. -->
        <item name="colorSecondary">@color/teal_200</item>
        <item name="colorSecondaryVariant">@color/teal_700</item>
        <item name="colorOnSecondary">@color/black</item>
        <!-- Status bar color. -->
        <item name="android:statusBarColor" tools:targetApi="l">?attr/colorPrimaryVariant</item>
        <!-- Customize your theme here. -->
    </style>
</resources>
(4) Todo Data Class 생성 - Model 용
item_todo.xml의 각 component (예로 textView, CheckBox)에 집어넣을 Todo Data Class를 생성해보자. Kotlin의 Data Class는 말그대로 custom Class에서 사용할 변수들만 모아놓은 클래스라고 보면 된다.
1) model package 생성 후 > 해당 package에 Todo.kt 생성
package com.example.kotlintodo.model

data class Todo (
    var title: String,
    var content: String,
    var isDone: Boolean
)
(5) Build.Gradle 수정 - viewBinding, dataBinding 용
viewBinding, dataBinding을 하려면 Build.Gradle (Module)에 아래 코드를 추가해 줘야 한다.
대체로 Android 코드를 보면 findViewById를 많이 볼 수 있는데, viewBinding을 사용하게 되면 각 xml 파일마다 binding class가 자동으로 생성되어서 binding.~~로 바로 접근 가능하다. 따라서 코드량이 줄고, null safety하단 장점이 있다.
dataBinding은 여기선 자세히 설명하지 않을 것이지만, xml 파일에서 <layout> 태그를 최상단으로 하고, <data> 태그를 그 밑에 넣으면된다. view와 data를 직접 연결하고 양방향 binding을 할 수 있단 점에서 장점이다. (허나 여기선 그럴 필요가 없어서 사용하지 않음)
buildFeatures {
        viewBinding true
        dataBinding true
    }
(6) MainActivity.kt + HomeFragment.kt 작성
드디어 MainActivity.kt과 HomeFragment.kt을 작성해보자. 우선은, MainActivity.kt에서는 xml Layout만 만들어 놨기 때문에 viewBinding으로 이를 kt과 xml 파일을 연동하는 정도로 간단하게 작성해놨다. HomeFragment.kt은 Fragment만 상속하는 정도로 매우 간단히 만들었다. (어차피 추후에 코드들 추가할 것임)
MainActivity.kt 주석을 보면 순서대로 작성한 것이 보이는데,
1. view binding을 설정해 xml과 kt을 연결한다.
2. MainActivity는 ToolBar와 FrameLayout으로만 이루어져 있으므로, MainActivity 실행 시 FrameLayout에 가장 먼저 첫번째로 보여질 fragment를 설정해준다. (이게 바로 HomeFragment)
=> 이를 위해서 supportFragmentManager를 사용한다. transaction을 설정하고, transaction에 fragment를 add 한 후 commit하면 HomeFragment Layout이 MainActivity의 FrameLayout 부분에 보여지게 된다.
3. ToolBar를 setSupportActionBar로 생성 해 title도 apply로 설정 후, onOptionsItemSelected와 onCreateOptionsMenu를 override해서 ToolBar를 사용할 수 있도록 한다. onOptionsItemSelected는 ToolBar menu에 있는 item을 select 했을 때 listener이고, onCreateOptionsMenu는 앞서 (3)단계에서 만든 app_bar_menu를 inflate하는 부분이다.
1) HomeFragment.kt
package com.example.kotlintodo

import androidx.fragment.app.Fragment
import com.example.kotlintodo.databinding.FragmentHomeBinding

class HomeFragment: Fragment() {

    private lateinit var binding: FragmentHomeBinding

}
2) MainActivity.kt
package com.example.kotlintodo

import androidx.appcompat.app.AppCompatActivity
import android.os.Bundle
import android.view.Menu
import android.view.MenuItem
import android.widget.Toast
import androidx.fragment.app.FragmentTransaction
import com.example.kotlintodo.databinding.ActivityMainBinding

class MainActivity : AppCompatActivity() {

    private lateinit var binding: ActivityMainBinding
    private val fragmentManager = supportFragmentManager
    private lateinit var transaction: FragmentTransaction

    override fun onCreate(savedInstanceState: Bundle?) {
        super.onCreate(savedInstanceState)

        // 1. View Binding 설정
        binding = ActivityMainBinding.inflate(layoutInflater)
        setContentView(binding.root)

        // 2. Main Fragment 설정
        transaction = fragmentManager.beginTransaction()
        transaction.add(R.id.frameLayout, HomeFragment())
        transaction.commit()

        // 3. ToolBar Setting & Change ToolBar title
        setSupportActionBar(binding.toolBar)
        supportActionBar?.apply {
            title = "Tasks"
            setVisible(true)
        }
    }

    // ToolBar menu selector
    override fun onOptionsItemSelected(item: MenuItem): Boolean {
        when(item.itemId){
            R.id.miSetting -> Toast.makeText(this, "Setting", Toast.LENGTH_LONG).show()
        }
        return true
    }

    // ToolBar menu create
    override fun onCreateOptionsMenu(menu: Menu?): Boolean {
        menuInflater.inflate(R.menu.app_bar_menu, menu)
        return super.onCreateOptionsMenu(menu)
    }
}
(7) FragmentStateAdapter 생성 - ViewPager2 용
우선적으로 FragmentStateAdapter에서 사용할 Fragment 두 개를 매우 간단히만 생성해놓는다. 기존의 viewPager에서 쓰던 FragmentStatePagerAdapter는 deprecated 되었고, ViewPager2는 FragmentStateAdapter를 사용한다.
FragmentStateAdapter는 인자 값으로 Fragment를 넘겨서 Fragment가 마치 하나의 item view인 RecyclerView같다. 참고로 FragmentStateAdapter를 상속하는 순간 getItemCount(), createFragment() 두 함수를 무조건 override해야 한다. (뒤에서 구현 방법을 다시 반복할 예정)
1) DoneFragment.kt
package com.example.kotlintodo

import androidx.fragment.app.Fragment

class DoneFragment: Fragment() {
}
2) PendingFragment.kt
package com.example.kotlintodo

import androidx.fragment.app.Fragment

class PendingFragment: Fragment() {
}
3) ViewPagerFragmentStateAdapter.kt
본 프로젝트는 Donefragment, PendingFragment 2개만 ViewPager의 Fragment들이므로 이들을 포함하는 fragments 라는 list를 생성한다. 해당 클래스는 FragmentStateAdapter를 상속 받고 있는데, 이 경우 getItemCount()와 createFragment() 두 함수를 무조건 override 해야 한다.
1. getItemCount는 fragments list의 size를 return 하는 함수
2. createFragment는 ViewPager의 position에 맞는 Fragment를 return 하는 함수다. (따라서 return fragments[position]을 통해 해당 position에 맞는 fragment를 반환 하는 것!)
package com.example.kotlintodo

import androidx.fragment.app.Fragment
import androidx.fragment.app.FragmentActivity
import androidx.viewpager2.adapter.FragmentStateAdapter

class ViewPagerFragmentStateAdapter(fragmentActivity: FragmentActivity): FragmentStateAdapter(fragmentActivity) {

    // ViewPager에서 이동할 Fragment list
    private var fragments: ArrayList<Fragment> = arrayListOf(PendingFragment(), DoneFragment())

    // FragmentStateAdapter 상속 시 무조건 override 해야하는 fun
    override fun getItemCount(): Int {
        return fragments.size
    }

    // FragmentStateAdapter 상속 시 무조건 override 해야하는 fun (View Pager의 position에 해당하는 fragment return)
    override fun createFragment(position: Int): Fragment {
        return fragments[position]
    }
}
(8) HomeFragment.kt 수정
이제 FragmentStateAdapter도 만들었으니 HomeFragment에 이를 연동해 보자. (6)단계와 달리 뭔가 많이 추가된 것 처럼 보이는데, 하나하나 짚고 가보자.
1. viewBinding 설정
2. View Pager의 adapter인 FragmentStateAdapter 생성
=> 단, Fragment에서 호출하므로 activity?.let{ViewPagerFragmentStateAdapter(it)} 으로 넘겨줘야 함
3. View Pager의 orientation 설정
=> 우리는 ViewPager2를 가로로 넘길 것이라 HORIZONTAL로 설정!
4. ViewPager2와 TabLayout을 연동할 것이므로 TabLayoutMediator 을 이용하며, tab.text를 ViewPager2의 position에 맞게 바꿔준다.
5. Fragment의 onCreateView는 View를 반환해줘야 하므로 return binding.root 까먹지 않기
1) HomeFragment.kt
package com.example.kotlintodo

import android.os.Bundle
import android.view.LayoutInflater
import android.view.View
import android.view.ViewGroup
import androidx.fragment.app.Fragment
import androidx.viewpager2.widget.ViewPager2
import com.example.kotlintodo.databinding.FragmentHomeBinding
import com.google.android.material.tabs.TabLayoutMediator

class HomeFragment: Fragment() {

    private lateinit var binding: FragmentHomeBinding

    override fun onCreateView(
        inflater: LayoutInflater,
        container: ViewGroup?,
        savedInstanceState: Bundle?
    ): View? {

        // 1. View Binding 설정
        binding = FragmentHomeBinding.inflate(inflater, container, false)

        // 2. View Pager의 FragmentStateAdapter 설정
        binding.vpTodo.adapter = activity?.let { ViewPagerFragmentStateAdapter(it) }

        // 3. View Pager의 Orientation 설정
        binding.vpTodo.orientation = ViewPager2.ORIENTATION_HORIZONTAL

        // 4. TabLayout + ViewPager2 연동 (ViewPager2에 Adapter 연동 후에)
         TabLayoutMediator(binding.tabLayout, binding.vpTodo){ tab, position ->
             tab.text = getTabTitle(position)
         }.attach()

        // 5. return Fragment Layout View
        return binding.root
    }

    // Tab & ViewPager 연동 및 Tab title 설정
    private fun getTabTitle(position: Int): String? {
        return when (position) {
            0 -> "PENDING"
            1 -> "DONE"
            else -> null
        }
    }
}
(9) AndroidManifest.xml 수정
여기까지 만든 토이 프로젝트를 Build하고 에뮬레이터에서 돌리고 싶다면, 한 가지 해야 할 일이 있다. 새로 만든 혹은 기존의 Activity들에 대해서 exported라는 property 를 추가해줘야 한다. 아래와 같이 android:exported="true"로 설정하면 된다.
1) AndroidManifest.xml 수정
<?xml version="1.0" encoding="utf-8"?>
<manifest xmlns:android="http://schemas.android.com/apk/res/android"
    package="com.example.kotlintodo">

    <application
        android:allowBackup="true"
        android:icon="@mipmap/ic_launcher"
        android:label="@string/app_name"
        android:roundIcon="@mipmap/ic_launcher_round"
        android:supportsRtl="true"
        android:theme="@style/Theme.KotlinToDo">
        <activity android:name=".ui.MainActivity"
            android:exported="true">
            <intent-filter>
                <action android:name="android.intent.action.MAIN" />

                <category android:name="android.intent.category.LAUNCHER" />
            </intent-filter>
        </activity>
    </application>

</manifest>
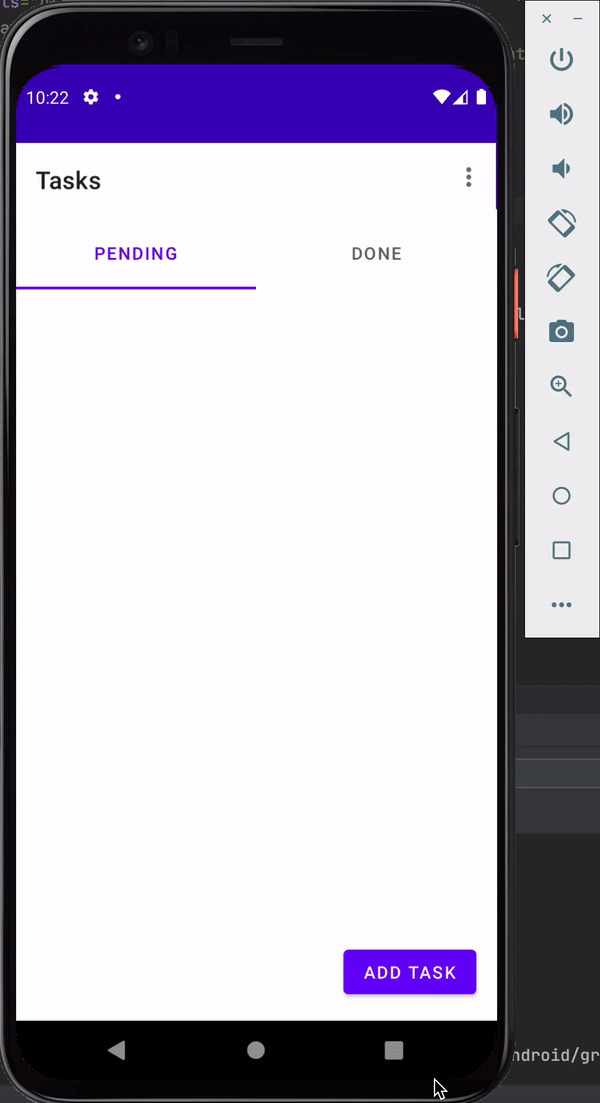
(10) 여기까지 최종 결과
ViewPager2랑 TabLayout이 연동되어 있고, ToolBar menu click도 잘 되는 것을 확인할 수 있다.
*GitHub 링크
https://github.com/leesoeun98/KotlinToDo
GitHub - leesoeun98/KotlinToDo
Contribute to leesoeun98/KotlinToDo development by creating an account on GitHub.
github.com
Reference
https://youngest-programming.tistory.com/546
'Android' 카테고리의 다른 글
| [Kotlin] Todo 토이 프로젝트 [3단계] (ViewPager2 + RecyclerView + ViewModel) (1) | 2022.04.30 |
|---|---|
| [Kotlin] Todo 토이 프로젝트 [2단계] (ViewPager2 + RecyclerView + ViewModel) (0) | 2022.04.23 |
| Android Clean Architecture (0) | 2021.06.08 |
| [Kotlin] RecyclerView 예제 (0) | 2021.06.06 |
| [kotlin] Okhttp+gson으로 오픈 API 사용하기 (0) | 2021.06.02 |


